


WHITE BALANCE
and why it is the MOST important color adjustment you can make
Sensors to date shoot everything in color. For black and white images, there are innumerable ways to "lose" your color. If you simply use a format to black and white command, you generally throw out about 75% of the digital information of your original capture. If you ponder that most great
black and white photographers shooting digital today maintain their black and white images in RGB color space and while you've got that in your craw, go look at the old masters and you will note there is almost always some degree of tonality in the image. For sure they were shooting black and white film, so the tonality came in at the printing stage. Or it was hand toned after the print was made.
For us, the tonality is implemented at the post production/image processing stage. And I recommend you NEVER produce any of your images in grayscale and never throw away any information that came with the original image. But I already digress.
I wanted to speak quickly about WHITE BALANCE and why I believe it is the most important color adjustment you can make. Period.
Picking the color of your whites results in setting the tone, the mood of the entire photograph. No really! And the best way to pick your whites, working on a calibrated monitor, is to use LAB color Mode Curves and a color picker dropper tool to read your numbers.
And killer thing is, you can do this non destructively on any image- from a fresh new TIF to an old and tired jpg. It can result in an entirely new way of seeing your image!
Here's how:
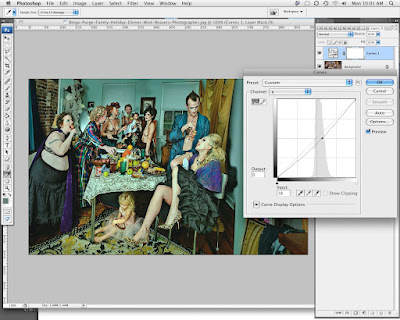
1) Open any image file and put it into LAB color mode (Mac: IMAGE>MODE>LAB).
2) On your layers palette, open up a curves adjustment layer. You will notice there are only 3 channels, Lightness, A and B. Your lightness channel adjusts luminosity, the A channel curve will adjust the Red and Green channels and their respective relationship, the B channel curve will adjust your Blue and Yellow channels respectively. For our purposes, it might suffice to consider only the color channels for this MAJOR move in White Balance as Luminosity is a contrast/brightness issue, not a white balance one.
3) Open A Channel curve and place a point on 0,0, right smack in the middle of the chart and the curve. This IS your present Red/Green White Balance Point. If your midpoint is BLACK, that means it is active and can be moved with your keyboard arrows. Move it right to make your White Point more GREEN, move it left to make your white point more RED. Set it to your new choice. For a warmer final image, you might bump it slightly into the RED. For a greener final image, move it right into GREEN. Click OK.
4) Open another LAB curve and this time open the B channel to adjust the Blue and Yellow channels selectively. Same thing, put a point in dead center of the chart in the midpoint of the
curve, Right, that's the present Blue Yellow balance of your image's present White Balance. For warmer tones, bump the point left into Yellow, or for cooler tones, bump the midpoint of your curve right into Blue. (I prefer to use separate LAB curves even though one can get the same end result to this point, but I like to go back to my adjustment palette and reduce opacity moving the opacity percentage sliders to fine tune the end result of my adjusted tones.
5) To alter nothing but the colors in this procedure, make sure your adjustment curves are in COLOR blending mode as opposed to Normal blending mode. You can experiment with blending modes,one of the more interesting, and as expected, would be to change the blending mode to Luminosity when you are adjusting the A or B channels (color channels, NOT a luminosity channel) and you will see you have NOT affected the colors in the Luminosity Channel whatsoever. As opposed to RGB color spaces where a color adjustment WILL affect the Brightness of the image and a brightness adjustment will affect the colors, in LAB mode these
adjustments are perfectly independent. NICE and non destructive. And MORE control.
So, once you've made some adjustments in both A and B channels and your blending mode is set to COLOR to make sure we are not changing anything BUT colors, play with the Opacity of each curve to make your image's tone/White Balance sing!
6) There are times when you need a pure neutral white balan
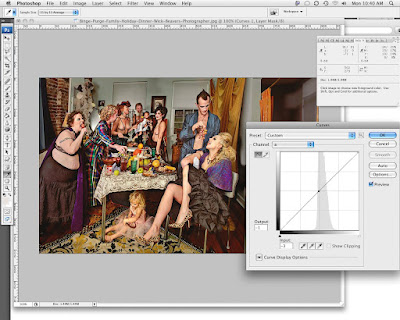
ce. Like when you're shooting a product like paint or fabric for absolutely correct color rendering. In this case, when each curve is open and you are looking for perfectly neutral white. remember there has to be something in your image you declare is white or neutral- without color or tone. Hopefully you shot a greytag macbeth color card, but if you didn't, you have to choose something in your image that is neutral. Once you find something, open your LAB curve adjustment layer and put your highlighted point

in your curve midpoint, open your INFO palette and NOTE the Lab readout in your info palette when you place your color picker on a chosen neutral point in your image. I chose the white glove as being "neutral white" in this image. You will see how my B channel reading is -9 from neutral (which is of course, 0). I need to move my white point to the Yellow side to bring the glove, which is reading blue in my image to neutral "0" white balance point. I leave the highlight picker on Info on the Glove and using my keyboard arrows to move the B curve midpont left until the B channel INFO reading is 0 or neutral.

Next I do the same thing for the A channel noting the original image's neutral white balance is actually too GREEN or set at -3. I need to bump the curves midpoint to the right to make it neutral/ equally red and green. At this point, you might notice a small change in the other channel, due mainly to your choosing another point on the glove for being your neutral white point. You can go in close and make sure you pick the same pixels if you want to get exact but remember!! You are just choosing your own NEUTRAL, not what is actually. So this method is always going to be subjective. To get it dead right, you need to shoot a color card.
Okay, I claim with a little or a lot of tweaking of the tone of your image, you will affect the way it is perceived a whole lot more than changing anything else in your image.
Any argument will NOT be accepted..
Ha!
Have a great photographic week!
Please visit my website www.wickbeavers.com for a look at some cool (or warm) images.
Wick


1 comment:
Rove is a products that are made using 100% organically grown cannabis, and stoners from the west to east drift use them. ...
Our cartscontain premium lab tried THC Oil which these days, is hard to find.
Our pre-filled cannabis cartridges are ideal for vaping Maryjane in a hurry.
Where to buy backwoods online?
Where to order rove carts?
Where to buy dank vapes?
og kush
Post a Comment